The Dirty Truth About Clear Paint Protection Film Installation
Bubbles, peeling, and poor protection. Learn the steps we take at Benchmark Auto Salon to get it right — every time.
Before applying Clear Paint Protection Film (PPF) to a car, it’s very important to make sure the outside of the vehicle is properly cleaned and prepped. Why? Because any dirt, dust, wax, or oils left on the paint can get trapped under the film. This not only looks bad, but it can also stop the film from sticking properly. That means it might peel or not protect your paint.
6 Key to Benchmark's Flawless PPF Install
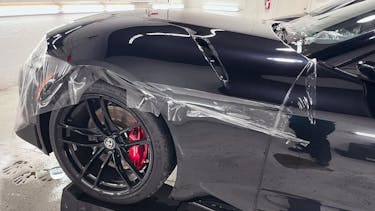
Properly installing PPF so that it's nearly imperceptible all begins with a thorough exterior detail, which the technicians at Benchmark Auto Salon are highly skilled at performing.
1. Power Wash & Soft Tip Brush
Proper prep usually starts with a deep wash to remove road grime, bird droppings, and other debris. After that, detailers often use a clay bar to pull out tiny particles that get stuck in the paint. Next, they’ll use a special cleaner to remove any leftover wax or polish. This gives the film a clean surface to stick to. At Benchmark Auto Salon, our exterior detail begins with a pressure washer and soft tip brush to clean:
- Edges
- Panel gaps
- Door jams
- Wheel faces and barrels
The inner edge of the engine bay (This is a step that’s often overlooked, but is essential to ensure no dirt or contaminants leak from hidden places and compromise your install.)
2. Dry & Prep Surface
After the initial power washing, the vehicle needs to be thoroughly dried and smooth. At Benchmark, we ensure this process is done with the utmost care by:
- Drying the car off with compressed air (This helps further clear out any cracks and hidden edges that may hold some grime)
- Removing any vehicle badges that would prevent technicians from having complete coverage during install (All badges are put to the side and later reinstalled in the factory location after the application is complete.)
3. Wash & Clay Bar
We then use a slip solution (soapy water) and clay bar to go over the entirety of the vehicle, to remove any dirt that may be etched into the clear coat and that hasn't come off from the initial wash. We then go over the vehicle with an adhesive solvent to clean up any residue from the clay bar, sap, bugs, or anything else that could have been on the car
4. Scratch & Swirl Mark Correction (if needed)
If the paint has scratches or swirl marks, those should be corrected before the film goes on. Otherwise, the flaws will still be visible under the clear film, and they’ll be harder to fix later. A properly prepped surface makes the final result look smooth and nearly invisible.
5. Manually Checking for Contaminants
To ensure nothing is left behind on the paint and it’s as clean as possible, a technician should physically check the car with their own hands.
Then a final pass with isopropyl alcohol is done. With newer vehicles, we find it beneficial to use some polishing compound and polish all the edges by hand. Doing so ensures that when we wrap over the edge, it stays down for the entire lifespan of the PPF.
6. Spray & Blow
The last step before installation is to do a final spray down of the panel and blow it off to remove any dust that may have settled. Only after this thorough cleaning process is complete does Benchmark use a mix of soapy water and diluted alcohol on the paint, onto which we lay the film down and get to work squeegeeing it out.
Skipping Steps Puts Your Vehicle’s Exterior at Risk
Skipping these steps to save time can cost more in the long run. You might end up with bubbles, edges that lift, or a film that doesn’t last. Prep work might not seem exciting, but it’s one of the most important parts of the process. Done right, it helps PPF look better and last longer, giving your car the protection it deserves.


